
Pitting is the most frequently asked defect question in every surface finishing forum — and the most frequently misdiagnosed. Shops add wetting agent, double it, change brighteners, change brighteners, re-filter the bath... and the pits keep coming back. The reason is simple: "pitting" is a symptom, not a cause. There are at least six different root causes that all look like small holes in the deposit, and each one is fixed differently.
This guide gives you the initial 10-minute screening procedure (plus the follow-up checks for each pit type) our line engineers use to separate gas pits from particulate pits, burning pits, substrate pits, oil pits and organic pits — with the exact parameter windows for each fix. It is written for working platers, not for textbooks.
Step 1: The Jeweler's Loupe Test (5 minutes)
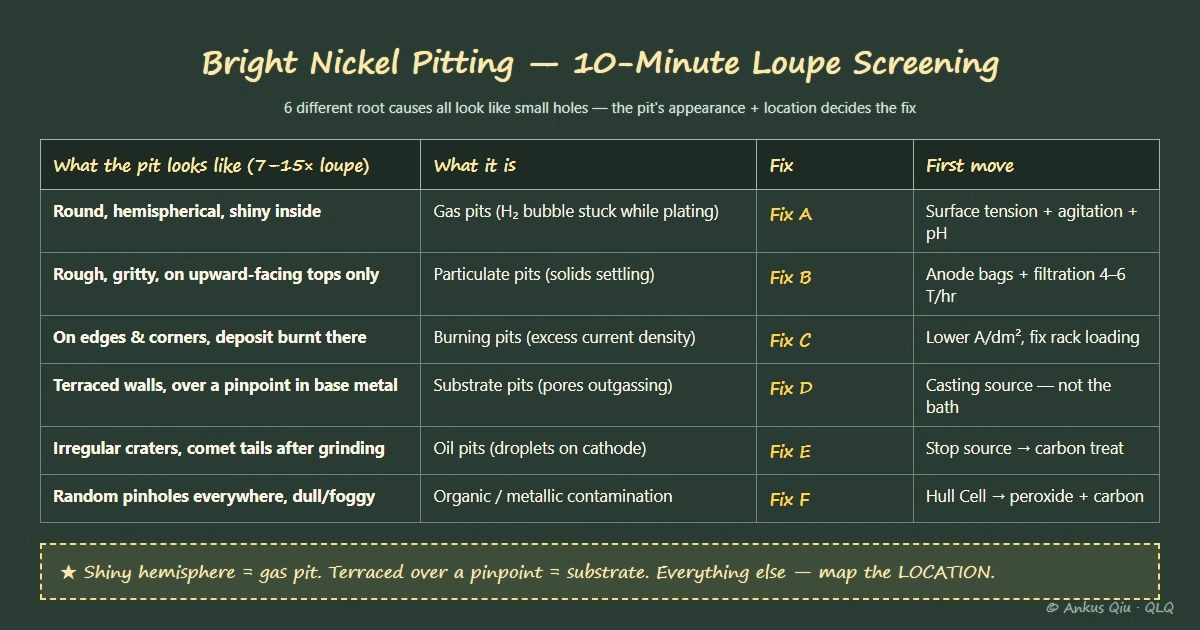
Before touching the bath, examine the pits with a 7× to 15× jeweler's loupe or a USB microscope. What you see decides everything:
| What the pits look like | What they are | Go to |
|---|---|---|
| Round, hemispherical, shiny inside | Gas pits (hydrogen bubbles stuck on the part while plating) | Fix A |
| Rough, gritty, concentrated on upward-facing surfaces ("shelf roughness") | Particulate pits (solids in the bath settling on top faces) | Fix B |
| Concentrated on edges, corners, high points; deposit burnt there too | Burning pits (excessive current density) | Fix C |
| Scalloped or "terraced" walls; often over a pinpoint in the substrate | Substrate pits (pores/inclusions in the base metal outgassing) | Fix D |
| Irregular craters, sometimes with "comet tails" after grinding | Oil pits (organic droplets sticking to the cathode) | Fix E |
| Random pinholes across the whole surface, dull or foggy deposit | Organic/metallic contamination (brightener breakdown, metal ions) | Fix F |
If the pits are shiny hemispheres, you have gas pits. Everything else follows from the loupe reading.
Fix A: Gas Pits (the #1 cause on rack lines)
Hydrogen is evolved at the cathode during any nickel plating. When a bubble lingers on the surface, deposition is blocked underneath it and a pit is left. Four parameters control whether bubbles stick:
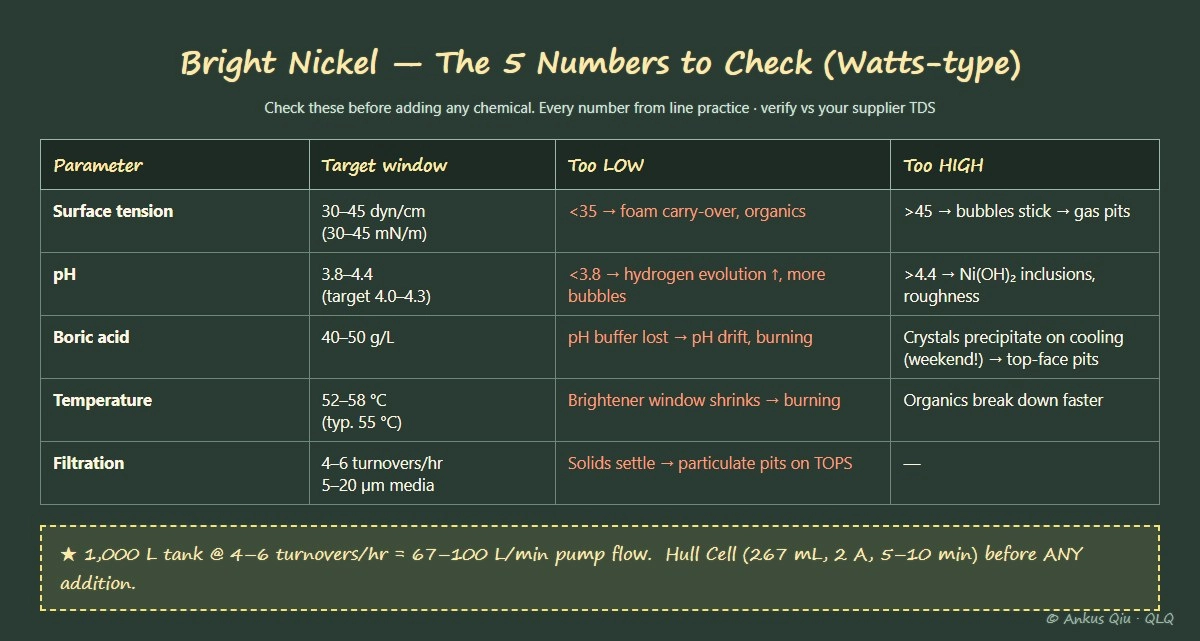
1. Surface tension: 30–45 dyn/cm (30–45 mN/m) for bright nickel baths — the exact target depends on your wetting agent system (AESF references ~30–40 for classic nickel; proprietary systems often run 35–45). Measure with your own system and hold it constant; a drifting number is itself a warning.
Measure it with a tensiometer or a calibrated wetting-agent titration kit. Below ~35 you risk foam (which itself blocks observation and can carry organics); above ~45 bubbles stick to the work. If your bath reads 31 dyn/cm (31 mN/m), that is not "extra protection" — it usually means the wetter has been over-added or is breaking down, and over-adding wetting agent behaves like an organic contaminant.
2. Wetting agent type must match your agitation.
- Mechanically agitated (cathode rocker): powder wetting agent
- Air-agitated (blower): liquid wetting agent
The wrong type either foams or doesn't disperse. Formulations vary by supplier — confirm the agitation-specific grade with your wetting agent supplier.
3. Agitation must reach the parts.
A classic failure: pits only at the bottom of the rack. The bottom position pivots around a stationary point and gets poor agitation, while the anode arrangement often drives higher current density there too. Measure deposit thickness at top vs bottom positions — if the bottom is thicker, the anodes are not shorter than the racks and the bottom is running hotter. Shorten the anodes or shield the bottom.
For air agitation: use a low-pressure blower, never compressor air. Compressor air carries oil droplets straight into the bath (see Fix E). Direct the blower holes so bubbles sweep across the work, not just rise past it. For box-shaped or cup-shaped parts, tilt the parts on the rack so bubbles have an upward escape route — no horizontal-upward-facing surfaces.
4. Current density and pH.
Too-high CD generates more hydrogen than the agitation can strip. pH governs how much hydrogen is evolved: below ~3.8 the cathode reaction shifts toward hydrogen evolution (multiplying bubble formation), while above ~4.4 you risk nickel hydroxide inclusions that roughen the deposit. Keep bright nickel at pH 3.8–4.4 (target 4.0–4.3, per AESF guidance) — and check your pH meter or fresh strips: paper test strips degrade fast in the tank room and give false readings.
Fix B: Particulate Pits ("shelf roughness")
Roughness concentrated on top-facing surfaces = solids settling out of the bath. Causes and fixes:
- Anode bags: torn, or bags below the solution line letting sludge wash out. Bags must protrude above the liquid level. New cotton bags: hot-water rinse before use.
- Filtration: continuous, 4–6 tank turnovers per hour (turnovers = pump flow rate ÷ tank volume; e.g. a 1,000 L tank needs ~67–100 L/min for 4–6 turnovers/hour), 5–20 µm media; for heavy builds or electroforming, 1–10 µm. A carbon-packed filter also removes organic precursors (see Fix F).
- Filter leaks: a tiny air leak on the suction side of the filter pump injects micro-bubbles that pit *differently* from gas pits — tighten hose clamps and check for air in the line.
- Foreign debris: flaking tank liners, parts dropping into the tank and dissolving, dust from overhead. Pump the bath to a spare tank, inspect and clean the plating tank, filter back.
- Boric acid crystals: boric acid solubility at 40–50 g/L falls sharply as a hot bath (>55 °C) cools down Over a weekend shutdown, crystals precipitate and settle; if the tank isn't fully re-dissolved and stirred before production, crystals land on top faces and cause localized pitting. Keep boric acid at 40–50 g/L (bright nickel typical) and fully re-dissolve after any shutdown.
Fix C: Burning Pits (edges and corners)
If the pits cluster on high-current-density areas and the deposit there is dark, burnt or powdery, you are simply exceeding the limit of the bath:
- Reduce rectifier current (compute actual A/dm² on the part area, not tank wall area).
- Racks overloaded or parts too close together starve middle parts and overload edges — fix loading first.
- Bath temperature too low shrinks the brightener's operating window; bright nickel runs at 52–58 °C (typ. 55 °C).
- Metal concentration low for the CD you're running: bright nickel typically NiSO₄ 280–320 g/L, NiCl₂ 45–60 g/L, H₃BO₃ 40–50 g/L.
Fix D: Substrate Pits (terraced, over a pinpoint)
If the loupe shows terraced/scalloped pit walls directly over a pinpoint in the base metal, the defect started in the substrate, not the bath:
- Porous die-cast zinc or brass: porosity outgasses through the deposit. Remedy is at the casting/source level (better porosity specification, resin impregnation), not the tank.
- Inclusion-rich steel: inclusions outgas during plating, leaving "oyster-shell" pits.
- These pits cannot be fixed with bath chemistry. Don't burn wetting agent and carbon treatments on a substrate problem.
Fix E: Oil Pits (craters, comet tails)
Oil floating on the bath or dragged in sticks to parts and leaves irregular craters:
- Compressor air is the classic source — switch to a blower.
- Leaking overhead pipes/drips; oil from a preceding chrome bath; inadequately rinsed electrocleaner.
- Oil in the nickel strike or copper strike upstream floats through.
- Remedy: find and stop the source, then carbon-treat the bath (oil is partially removed by carbon and by the wetting agent's emulsification — but the source must be stopped first).
Fix F: Organic / Metallic Contamination (random pinholes, dull deposit)
Brightener breakdown products and metal ions cause fine random pitting, often with a hazy deposit:
- Brightener imbalance: too little = dull/burnt; too much = brittle, flaky, pitted deposits. Run a standard Hull Cell test — use the 267 mL Hull cell per AESF guidelines for bright nickel diagnosis (2 A, 5–10 min, ~4×10 cm panel); 500 mL / 1 A variants (10×7.5 cm panel, ASTM B374) exist for other purposes — whichever cell you use, compare panels only against tests run in the same cell type. reproduces the whole current-density spectrum on one panel — its purpose here is to verify brightener concentration and organic cleanliness before touching the production tank. Run one before every additive addition. A "nice slug of brightener" fixes 7 out of 10 dull baths, but confirm in the Hull Cell first.
- Brightener shelf life: typically 12–18 months from manufacture (industry rule of thumb quoted by suppliers; check your drum date). Rotate stock; old brightener decomposes into pitting organics.
- Metallic contamination: copper from dissolving S-round anodes must be removed by dummy plating (electrolytic purification at low current density, 0.05–0.5 A/dm², typically overnight (8–12 h) — the exact CD depends on the contaminant; low CD plates out copper preferentially). Chromium drag-in causes hazy deposits with pitting. Iron from rusty incoming water or tank walls causes grainy, sandblasted-looking pits.
- Treatment: hydrogen peroxide (33% grade) at ~2 mL per 1,000 L of bath ≈ 0.66 g/L active H₂O₂ — start low, Hull Cell the result, and repeat only if needed; permanganate also works on stubborn organics but generates manganese dioxide precipitate — filter the bath thoroughly afterwards or the brown MnO₂ particles become a new roughness source + permanganate for severe organics, then carbon — but peroxide/permanganate "burn" brighteners, so add fresh brightener after treatment. Always confirm the treatment in a Hull Cell beaker before committing a production tank.
The 10-Minute Diagnostic Summary (pin it at the tank)
1. Loupe the pits (2 min): shiny hemispheres = gas. Terraced over a pinpoint = substrate. Everything else: check location.
2. Location map (3 min): tops only → particulate. Edges/corners → burning. Bottom of rack → agitation + CD. Whole surface, random → organic/metallic.
3. Check the 5 numbers (5 min): surface tension (35–45 dyn/cm (35–45 mN/m)), pH (3.8–4.4), boric acid (40–50 g/L), temperature (52–58 °C), filtration running with turnover 4–6 tank turnovers/hr.
4. Hull Cell before any chemical addition — always.
5. If gas pits persist after A: run a swap test — move pitted parts to the top of the rack and clean parts to the bottom before nickel. If pitting follows position, it's the tank; if it follows the part, it's the pretreatment or substrate.
Real Line Example
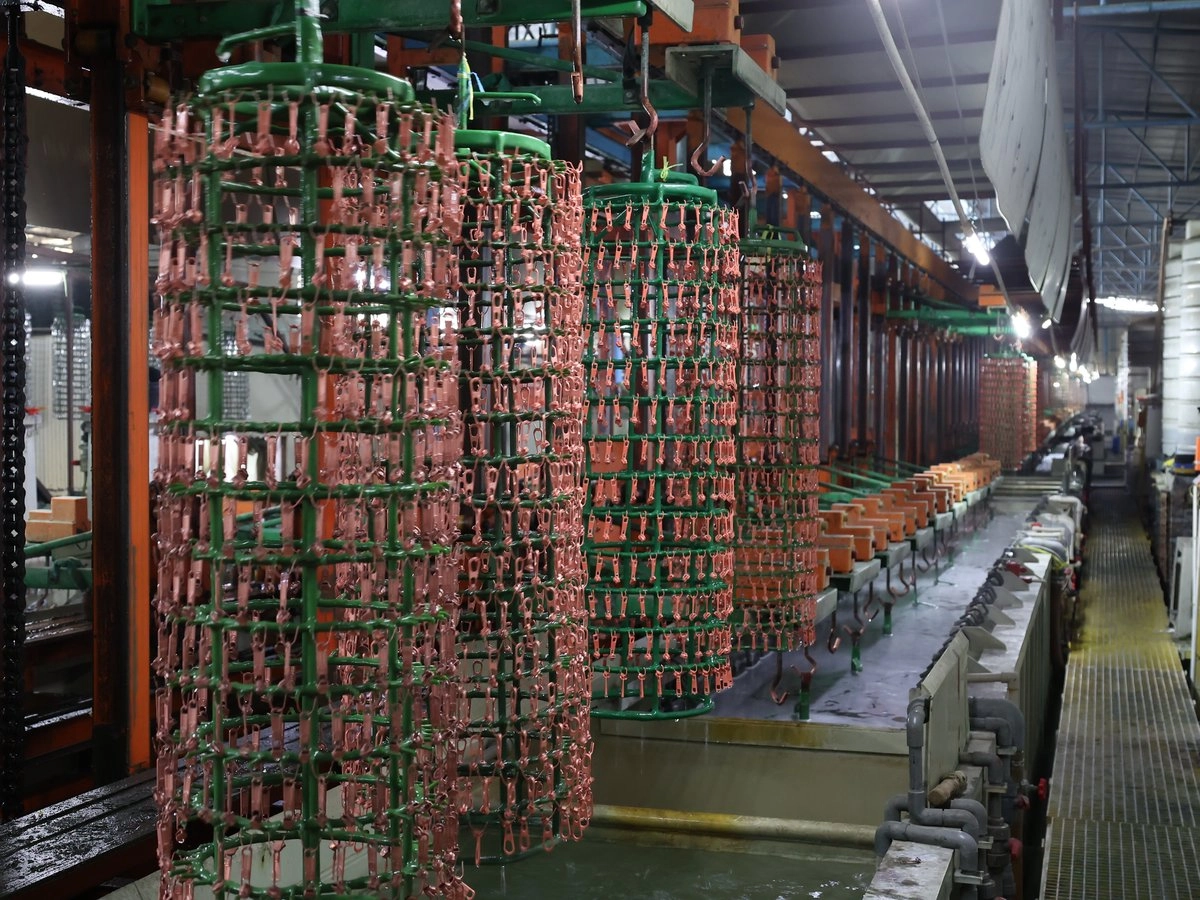
A bright nickel line (NiSO₄ 300 g/L, NiCl₂ 50 g/L, H₃BO₃ 40 g/L, pH 4.0, 56 °C, mechanical agitation) ran clean for months, then pits appeared — always at the bottom of every rack. The swap test confirmed position-dependence. Thickness measurement showed bottom parts ran ~15% thicker than top parts: the anodes hung level with the racks, over-driving the bottom. Anodes were shortened 10 cm, rocker stroke increased, and surface tension was re-tuned from 31 to 38 dyn/cm (38 mN/m) with the correct powder wetting agent. Pitting went from ~8% of parts to under 0.5% within two days — no bath dump, no expensive additives.
FAQ
Q: Can I just keep adding anti-pitting agent?
A: No. If surface tension is already 35–45 dyn/cm (35–45 mN/m), more wetting agent acts as an organic contaminant and makes pitting worse (this is documented repeatedly on finishing threads). Verify the number first.
Q: Why do pits appear after a weekend or holiday shutdown?
A: Two classic reasons: boric acid crystallizes as temperature drops (Fix B), and idle-time organic breakdown accumulates. Fully re-dissolve and stir before production; run a Hull Cell panel before the first rack.
Q: Air agitation or mechanical — which is better against pitting?
A: Both work; the failure modes differ. Air gives even coverage but risks oil contamination (compressor) and over-agitation impingement pitting if too strong. Mechanical avoids oil but often leaves rack-bottom dead zones. Either way, verify with thickness measurements and a loupe.
Q: The pits only appear after grinding (electroless nickel). What now?
A: "Comet tails" after grinding point to gas pits around substrate inclusions that filled from the side and popped off in grinding. Check surface tension and filtration; consider a lower-pH run to slow deposition. This is documented in electroless nickel threads as an inclusion + gas-pit combination.
Q: How often should I change anode bags?
A: Inspect weekly (tears, sulfur bleed-through). Replace when deposits start showing top-face roughness that filtration doesn't fix, or on your preventive schedule — typically every 3–6 months depending on line hours.
Safety Notes
- Hydrogen gas: evolved at the cathode during nickel plating — in enclosed or poorly ventilated tank areas it is an explosion hazard. Keep tank-room ventilation running; never smoke or allow open flames near an operating line.
- Chemical handling: nickel salts are skin sensitizers and suspected carcinogens (IARC 2B) — wear nitrile gloves, goggles and apron when sampling or adding chemicals. Acid and boric acid additions: add chemicals to water, never water to concentrated acids; boric acid should be pre-dissolved in hot water or a boric-acid slurry tank before adding to the production bath.
- Carbon/peroxide treatments: peroxide and permanganate treatments evolve heat and gas — add slowly, in a separate treatment tank, never directly to a hot production bath.
Note: This guide covers the common pitting causes for bright nickel and acid zinc systems. Complex or persistent cases — especially electroless nickel, sulfamate nickel, or alloy plating — involve additional variables (stabilizers, complexing agents, impurity thresholds) that are formulation-specific. For those systems, involve your chemical supplier's technical service with a Hull Cell panel and bath analysis; they can diagnose formulation-specific causes far faster than generic troubleshooting.
*About the author: Ankus Qiu — senior process engineer at QLQ (Guangzhou QLQ Enterprise Co., Ltd.), 25 years designing and troubleshooting barrel- and rack-plating lines for zipper sliders and hardware. QLQ supplies complete plating lines, in-house chemical systems and on-site process support; the company is ISO 9001 certified and exports to 70+ countries. This guide distills diagnostic procedures used across QLQ's customer base and finishing-community practice; for formulation-specific issues, your chemical supplier's technical service remains the final authority.*
*Technical sources: cross-checked against long-running finishing.com troubleshooting threads (bright nickel pitting, gas pitting, nickel sulfamate pitting) and QLQ line records. Parameters are engineering practice values — verify against your supplier's TDS for your specific brightener system.*